JAQ Tutorial

About this document
This document goes through the basic day to day use of JAQ. If you're setting up JAQ for the first time, you should read the “JAQ Set Up” document first.
As JAQ is in constant development, some new features may not be included in this document, however the basic steps have not changed.
There are two parts to the JAQ system. JAQ, which is the main system used by office and administration staff, and Shop Clock, used by floor staff to enter their time sheets, receive purchases, etc, And the mobile phone / tablet interface. In this document we will cover the JAQ system. For information on using Shop Clock, see the document “ShopClock Tutorial” ( in development ).
 |
 |
 |
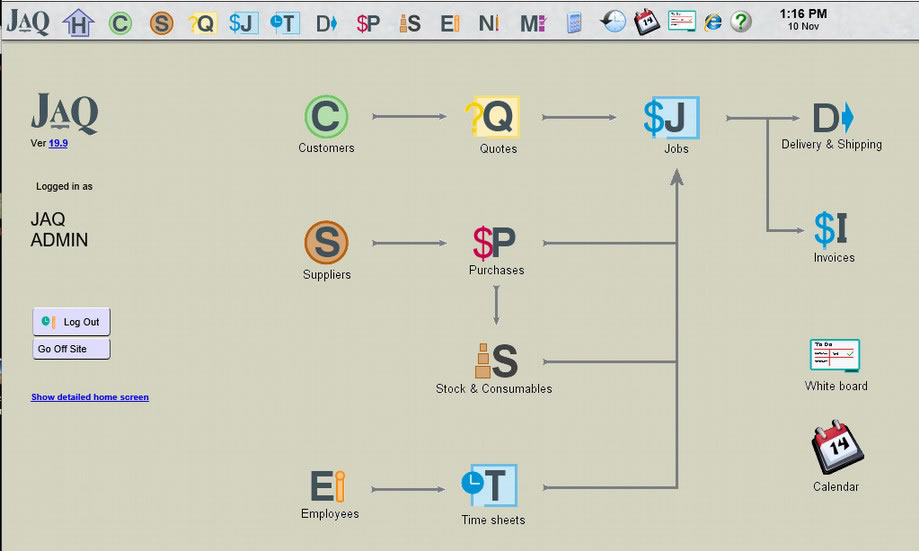
| JAQ's main page. |
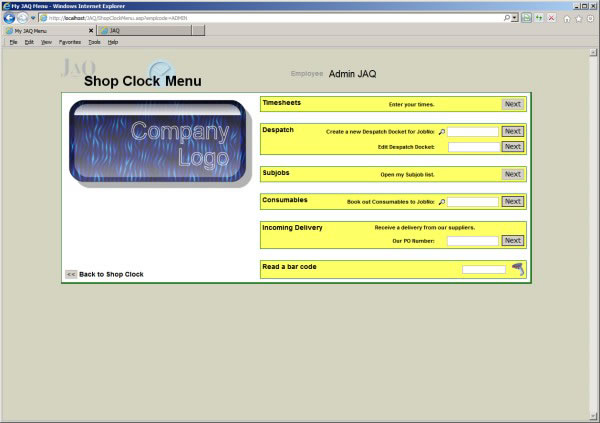
Shop Clock's main page. |
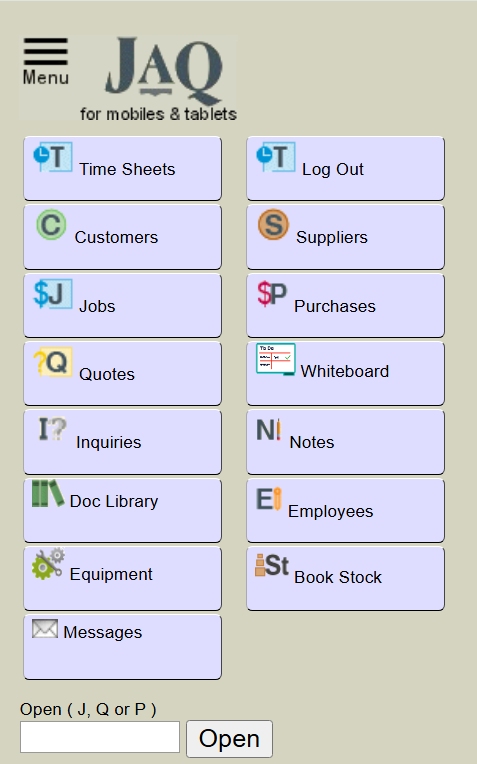
Mobile phone main page. |
What is JAQ
JAQ ( Jobs And Quotes ) is a business/workshop management system that combines several day to day tasks into one software application. A typical business may use several software applications to perform different tasks, for example… A customer or supplier list using Outlook. A quoting system using Excel spreadsheets. A purchasing system using order books. A job tracking system using hand written job sheets.
While all these individual systems do work, they are not interconnected, and usually can only be accessed from specific computers in the office, so you need to be on that computer to access that data.
JAQ is intranet based, meaning you can use any computer in your office, workshop, or even remotely, to access your business data. The JAQ interface uses a internet web browser, like Microsoft’s IE, Chrome, Apples Safari, so can be used on any PC, tablet or mobile device. If you have any experience surfing the internet, then you will find JAQ easy to use.
The JAQ system is under constant development, and this means your version of JAQ will be updated from time to time to keep up with the 'current version'. The changes made to JAQ can be defined as....
- Updates. Based on user feedback, modifications and additions are made to JAQ to improve its usability. This could be as simple as a fixed spelling mistake or as complicated as a completely new software function.
- Bug Fix. Due to JAQ’s rapid application development (RAD) model, errors do pop up in JAQ from time to time. The JAQ system is complicated, and sometimes when a change is made to one section, as part of a update or bug fix, it can cause another section to not work as expected. While any changes made to JAQ are tested before sending out updates, bugs do get through and may not show themselves until the updated version of JAQ has been released into the wild.
If you have a suggestion to help improve JAQ, no matter how small, please let us know. All suggestions are looked into, though sometimes we will not adopt the change you suggested. If this is the case, we will always explain why. Any errors in JAQ are treated with urgency. The most important information we need to fix an error is the sequence of events that cause it. If we cant replicate the error, it makes it very hard to find the cause. Please send any suggestions or errors to sales@jaqsoftware.com
Getting more help
JAQ includes help information on most pages. Wherever you see the info tag [#] ( square brackets around a number ), then look towards the bottom of the page for the matching tag for help information relating to that tag. Also keep an eye out for the Information symbol  , moving your mouse cursor over these will display a help message. If you have further questions, please feel free to email support@jaqsoftware.com.
Navigating around JAQ
If you've ever used a web site like eBay, Amazon, etc, then you will find JAQ easy to navigate.
The pages in JAQ use Forms, which contain Fields, a place for you to enter information. There are many different types of fields.
Almost every page where you entered information into a form file will have a Save button, for example.
 |
|
Some form fields in JAQ have a red border. This means its a required field, you must fill it out.
There are also icons that are helpful.
  
Tips on how to use
the page |
 
This needs your
attention |
Click on this to
open a
help and
information
panel. |
 
Click on this to open
a popup where you
select something. |
The top menu in JAQ is referred to as the “Menu”

The icons stand for...
|
Home, or the main JAQ home page. |
|
|
Customers. |
Address book. Add a customer. Add a inquiry. Marketing |
|
Suppliers. |
Address book. Add a supplier. Marketing. Couriers. Contractors |
|
Quotes. |
Quotes list. Add a quote. |
|
Jobs. |
Job list. Add a job. Subjobs. Reports. |
|
Invoices |
Invoice list. Add a invoice. |
|
Time sheets. |
Enter your time sheets. View employee time sheets. Reports. |
|
Deliveries |
Delivery list. Raise a delivery. |
|
Purchasing. |
Purchase list. Raise a PO. Receive goods. |
|
Stock |
Stock Register. Place a order. Show booked stock |
|
Employees. |
Employee list. Add a employee. Licences and certificates. |
|
Registers |
Equipment register. Test & Tag. Documents. Incidents. Hazardous chemicals |
|
Notes. |
Add a note. |
|
Manager section |
More reports |
|
Calculators. |
GST. Scientific. |
|
History. |
What have you looked at recently |
|
Calendar. |
Show Notes, due dates, events on a calendar. |
|
White board. |
What's going on. |
|
Open new window |
Open another copy of JAQ in a new window. Unlimited. |
|
Help |
Help pages for JAQ |
|
Setup |
JAQ settings, accounts, charge codes, rosters. |
|
JAQ comes with a shared network drive that works with the records you create. When you add a new customer, quote, job, etc, JAQ will create a matching folder on the drive. We'll talk more about this drive later, but for now knowing its existence will help with the tutorial.
For more information on JAQ folder structure, see here |
|
J:/
JOBS/
AATRUCK/
J2304 Fit security doors/
J2481 Replace broken window/
ATOS/
J1244 Replace Rollerdoor/
|
Getting Started with JAQ
The basic idea....
Lets pretend we are a building business, and we have been asked to build a fence for a new
customer, Fred Smith. What we'll do is go through the basic steps of...
- Adding a new customer.
- Creating a quote for that customer and sending them a PDF.
- Getting the go ahead and turning the quote into a job.
- Breaking the job into parts ( sub jobs ) and assigning those parts to employees.
- Making a purchase for the job. Adding a Supplier
- Booking out consumables against the job
- Booking out hours against the job.
- Despatching goods.
- Reviewing how the job is going.
- Closing the job and invoicing the customer.
 Adding a new Customer
From the top menu, select → New Customer.
Before you add a new customer, its always a good idea to look though JAQ's address book ( Customers / Address
Book ) to see if the customer already exists. The customer address book has a search feature.
The New Customer page will ask you for a Customer Code and Customer Name. The Customer Code is a shortened
version of the customers name, an abbreviation. The code can only contain alpha-numerics ( 0-9 and
A-Z, no other characters allowed ), and should be no longer than 30 characters. JAQ will tell you if the code you
are trying to enter has already been used.
Example:
A code for Fred Smith could be FSMITH or FREDSMITH.
Some accounting programs wont allow you to use the same code for suppliers and customers, meaning if a business you
deal with is both a customer and supplier, you will need to use a different codes. As JAQ needs to be compatible with accounting program standards, it will follow the same rule. We
suggest adding a CUS or SUP, or just a 01 to the end of the code.
For the sake of readability, the Customer Name should be in mixed case, that is, not all capitals. Example, Fred Smith
instead of FRED SMITH.
Note:
While it is easy to change the customer name at a later date, it is not so easy to change the customers code, so please think about the customer code before saving.
Once you have entered a new customer code and customer name, click Next.
JAQ will save the customer details, create some folders on the network drive, and display the New Customer Added page. From here
you should go to the Continue entering the Customer Details. page, where you can then add additional information
about this customer. Remember, the more information you add, the better JAQ will work. JAQ requires the following
customer details.
- At lease one Postal Address
- At least one Delivery Address
- Payment Terms
JAQ allows you to add more than one Postal and Delivery address per customer. Some larger companies can have several
postal and delivery address, and may require you to send goods to one address for one job, and another address for
another job. They may also want the invoices sent to different addresses. When you create more than one delivery or
postal address, give each address a unique Alias ( or nickname ). Then when you create the job card, you can choose the
address by its alias.
Example:
A company may have 2 delivery addresses, one in Townsville and one in Mackay. The alias`s could simply be
called Townsville and Mackay, and when you choose which address to use by its alias, JAQ will
know the full address to print on the delivery dockets and invoices.
Note:
Tip: If JAQ knows the full address, it can use Google Maps to display a map. Look for the Google icon on the
Customer Details page.

You should also make the customer Active. When Active, JAQ will allow new jobs to be created for this customer. When
not Active ( say for example they haven't paid their bill ), JAQ will not allow any new jobs to be created against this
customer, and a warning message will be displayed on any existing jobs in the system.
A customer may also have a preferred courier. Couriers are Suppliers with the Courier option box ticked. Select the
customers courier from the Preferred Courier drop down list, and include the Courier Account number if the customer
has one. When you create a Delivery Docket to send goods to this customer, the details will be retrieved from here.
Once you have provided JAQ with as much customer detail as possible, click Save to return to the customer details page.
JAQ also recommends at least one contact for the customer. You can either add a contact now or when you create a quote or
job for this customer. To add a contact, click on the New button above the Contacts list on the Customer Details page.
 Adding a Quote
First up, we don't need to start every job with a quote. If you already have the go ahead to start a new job, then you can
go straight to starting a new job from the menu, → New Job Card, or by clicking the New Job button on the
customer page. You can also go backwards, create a quote from an existing job. This is handy if you want to create a new
quote from a job you've done previously, or if the job goes over budget and the customer now requires a quote to
proceed.
→ New Job Card, or by clicking the New Job button on the
customer page. You can also go backwards, create a quote from an existing job. This is handy if you want to create a new
quote from a job you've done previously, or if the job goes over budget and the customer now requires a quote to
proceed.
In JAQ, all quotes start with a “Q”, like Q123.
Its a good idea to have a test quote ( and job ) in JAQ so you can experiment.
There are a few ways we can start the new quote process. We can either go to the menu and select → New
Quote, and then select the customer when asked. Or we can first find the customer, say though the Customers → Address Book, and click on the New Quote button at the top of the Customer Details page.
Next JAQ will ask for a contact, which you can select from the drop down list or add on the fly, and
a Quote Title. The Quote Title is used as a short description of this quote, like “Build Fence”.
Note:
There are a few area's in
JAQ that wont let you use any special characters ( !@#$/?%. etc. Anything other than letters and numbers ) because it can cause problems with folder names,
and the quote title is one such case. So a quote title like "Build & paint fence / gate" is not allowed, JAQ will change it to "Built _ paint fence _ gate" as you type it in. This is because we cant use the & or / symbols in a folder name. "Built and paint fence, gate" will work
Once you have entered the quote details, click Save.
JAQ will generate a unique quote number for you and create a folder for you using the customer code and then the quote number and quote title.
Example:
If the Customer Code was FREDSMITH, then you will end up with a folder like Q: / FREDSMITH / Q123 Build and paint fence, gate
You should now see the Edit Quote page. This is where we build and price our quote.
Most of the fields on the Edit Quote page, with the exception of the Line Items further down the page, are for generic information and not required. Any fields that must be filled in are highlighted in red. Remember the more information you can put in,
the better JAQ will run. JAQ uses a lot of this information to prepare the quote’s PDF for you, and to track hours and
costs once it becomes a job, so it pays to add as much information as you can, especially for the big dollar quotes.
One required field is the Closing Date. JAQ uses the closing date to notify you if the closing date is
about to pass, but you haven't sent the quote to the customer yet ( the Date Sent field ). Some large quotes can take
time to put together and can be forgotten, so JAQ uses this closing date to remind you.
Ignore the Price box, it will fill itself in automatically as you add items to the Line Items list.
OK, on to the line items. The Line Items section of the quote ( it’s also used on Jobs ) is like a shopping list, where you
enter in charge fees, consumables, purchased items, notes, etc. You can either manually enter the line items, or let JAQ
select them from its Products, Fees and Stock records. To manually enter line items, just type in the information into the
Details column, the Account number if you know it, the Quantity, Units, Cost Price per unit and Quote Price per unit.
JAQ will automatically fill in the Cost Sub Total and Quote Sub Total for you. It will also update the total quote price in
the Price box at the top of the page.
A quicker way to add line items, provided the fees and stock item records are set up correctly ( see the help document
JAQ Setup ), it to use the Category column drop down lists, and its little magnifying glass ( ).
Try changing the Category drop box to Process/Fee, and then click , and a window will popup listing all the
standard process fees. Click on the arrow next to the fee you want to use, and it will copy the details into the quote for you. All
you need to do then is enter a quantity, and that line item is done.
Another Category we can use is the Stock Items. Just like the standard processes, this will bring up a popup window listing the
stock items. From this popup you can search through your stock items by its code or supplier, and you have the option of
choosing the price range you want to use for this quote.
If you need to purchase items in for the job, use the Purchased Items option from the Category list.
The Product option is
covered in the help document JAQ – using Products/Kits.
Another feature of the line items is the Group and Goods column fields, used to group line items together.
The Goods tick box is used to identify lines that are to be dispatched. The Group is used to tie lines together.
For example, a list of items set up like this -
will group together like this -

The Group field ties items together under one description. JAQ will total the prices together for all line items under the
same Group.
The fn ( Footnotes ) column will let you add notes at the bottom of the quote page for that line item, eg "Price from Mitre 10".
Any items needing to be dispatched, once this quote becomes a job, need to be ticked as a Goods. JAQ will look for items
marked as Goods when you create a delivery docket.
Lastly, you can reorder the line items or add blank lines using the little arrows to the left of each line.
Don't forget to Save.
Back ont the quote page, looking down the page you will see a Files section. These are the folders JAQ created for this
quote, and you should save any relevant documents here. Clicking on the folder icon should open the folder for you on
your computer, but this may not always happen if your computer hasn't been prepared for using JAQ correctly, see Setting up your browser to work with JAQ
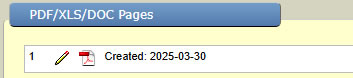
The PDF/XLS/DOC Pages section of the quote page is where we put our quote together as a PDF to send to our customer. Click the
Create new PDF, using all items options -

and JAQ will open a Create a new PDF page. Fill in any extra information you wanted included on the PDF, and click Save,
then click Back to the Quote. If you have a look at the PDF Pages section now, you will see its added a line of icons,
which will let you Edit the PDF and view the PDF, and if you added a Contact with a email address, send a
email to the contact.
Depending on how your JAQ is set up, you can send the PDF directly to the customer from JAQ. JAQ will also send a copy to your own email address so you have a copy.
You can create as many quote PDF's as you like, JAQ will call extra PDF's Revisions, and display then as Rev 1, Rev 2, etc.
Once you have sent the quote off to the customer, you can put the date into the Date Sent field. This will stop JAQ reminding you the quote needs to be sent.
Creating a Job
In JAQ, all jobs ( with the exception of internal jobs ) start with the letter “J”, example J200. You can create a job from scratch, of from a quote that's been given the go ahead.
If the Job is unquoted, start the process by using the menu's → New JobCard button, or the New
Jobcard button on the Customer Details page.
If the job was quoted, and the customer has given you the go ahead, then open the quote in JAQ and click on the Create Job from this quote button. You can find the quote by either searching for it on the Quote List, from the Customer Details page, or the View Quote shortcut on the front page.
The next page will ask you to provide a Customer
Order No, and this is required, you must provide a customer order number or JAQ wont let you proceed.Once you have checked the details, click Save. JAQ will create a new job number, say for example J200, and then create a folder for you, example J: /
FREDSMITH / J200 Build Fence.
If the job was from a quote, JAQ will optionally copy any quote files over to the new job folders, and copy the line items from
the quote into the job card.
Note
The Job number and Quote number are likely not the same number, Q1234 could become J5432. This is by design, as a quote could be used for more than one job, and a old job can become a new quote. On the View Quote JAQ will let you know what job it became and provide a link. Same with the Job page, there will be a link to the Quote.
You can now edit the Job to make any changes. We suggest adding the following information to get the most out of JAQ
- Estimated Hours. If you enter a Estimated Hours
value, and hours are booked to this job, JAQ will let you know if the booked hours go over the estimated hours. You can
then allow for the extra labour costs on future quotes for the same type of job.
- JAQ uses the delivery date to notify you if
the job is running late.
- The line items on a job card work in exactly the same manner as on a quote.
Don't forget to Save
On the job page, there is a row of tabs, these are used to access the various parts of a job we'll go into soon.

Sub Jobs
A job can be broken down into several steps or tasks, called SubJobs.
This isn't necessary, but can aid in tracking larger jobs. You can use sub jobs to schedule the flow of a job, break up the costing's of a large jobs over several sub jobs, set a dollar and time budget to each subjob, and send sub jobs to different departments. The person who is responsible for the job ( production manager, foreman ) can create a series of SubJobs that need to be
completed in order to finish the job.
Example.
Customer requires some steel flanges. This job could be broken down into 4 sub jobs.
SubJob 1: Order Steel Blanks
SubJob 2: Machine Flanges
SubJob 3: Pack and dispatch
SubJob 4: Invoice
Each sub-job can be sent to a department or employee.
SubJob 1: Order Steel Blanks > Store man Bob
SubJob 2: Machine Flanges > Machine Center
SubJob 3: Pack and dispatch > Store man Bob
SubJob 4: Invoice > Kate in Accounts
And the sub jobs can be sequenced.
SubJob 1: Order Steel Blanks Store man Bob Start Monday
SubJob 2: Machine Flanges Machine Center After SubJob 1 is finished
SubJob 3: Pack and dispatch Store man Bob After SubJob 2 is finished
SubJob 4: Invoice Kate in Accounts After SubJob 2 is finished
You'll notice in this example we started both SubJob 3 and 4 together, triggered by the completion of SubJob 2.
Once set up, JAQ will automatically notify each department or employee in sequence as they need to start on their sub
job. If the foreman correctly breaks up a job into sub jobs and sequences them, the job work flow should take care of
itself as each department or employee goes about their assigned sub jobs.
JAQ can also send the production manager messages as sub-jobs are completed, and the sub job progress is visible on
the job card page in JAQ. This means the production manager can keep an eye on job progress, and notify the customer
of how their job is going, without leaving their desk.
JAQ can also track costs for each sub job. When an employee books hours, consumables, etc against a sub job, JAQ
records these values in total against the job card, and individually against sub jobs. So you can use sub jobs to break up
the costs in a larger job.
Adding a sub-job.
- On the job page, in the Sub Jobs box, click Add a new Sub Job button.
- Select the Department, and give the sub job a Title. Try using the icon to display previously used titles.
- Enter the Sub Job Description, these are the instructions to the employee.
- Add a Due Date, that is, the date the sub job needs to be completed by.
- Select the Employee who will be performing the sub job.
- Select when you want the sub-job to start, either a time or after another sub-job.
- Click Next to save.
From the job page, you can edit a sub jobs by clicking the edit icon next to the sub-job number. You can
print a copy of the sub job for the employee by clicking the printer icon.
If you want to change the sequence of sub job flow, click on then Edit Schedule button. This will open the Sub Job
Schedule page, where you can change the order of sub jobs, and optionally set up JAQ to send messages once sub jobs are finished.
Tip.
Need to track re-work on a job? Just add a new sub job, call it "Re-work". and advise your employees to book any costs and hours to the re-work sub job. This will still let you see what portion of the job was put towards re-work.
 Purchases
A Purchase Order ( PO ) is used when you need to order in something ( stock, parts, consumables, etc ) from a supplier. In JAQ
every purchase order is tied to a Job Number, and this can be a customers job, or an internal job. Purchase orders can
only be raised for suppliers in JAQ`s supplier lists.
In JAQ, purchases have the prefix “P”, example P1035.
Before adding a PO, we need to add the supplier is they are not already in the system.
 Adding a new Supplier
From the top menu, select → New Supplier.
The New Supplier page will ask you for a Supplier Code and Supplier Name. The Supplier Code is a shortened version of
the suppliers name, an abbreviation. The Supplier Code and can only contain alpha-numerics ( 0-9 A-Z ), and can be no longer than 30 characters.
Example
Fred`s Building Supplies could use FBS or FREDBS as a Supplier Code.
As mentioned before when we added a new customer, many accounting programs wont allow you to use the same code
for suppliers and customers, meaning if a business you deal with is a customer of and supplier to your business, you will
need to use a different code for them as a supplier and as a customer. As JAQ needs to be compatible with accounting
program standards, it will follow the same rule. We suggest adding a CUS or SUP to the end of the code, or just add a
number.
Once you have entered a new Supplier Code and Supplier Name, click Next. If there is another supplier record matching
the supplier code you entered , JAQ will let you know so you can then try a different supplier code. JAQ will not allow
two identical Supplier Codes.
Note
Changing a supplier, customer or employee code after its been saved is possible but difficult, usually requiring help from JAQ support. This is because JAQ uses these codes throughout its database to locate records.
JAQ will add the new supplier to its records, and create a folder under U:/Suppliers/ ( depending on how your JAQ is set up ) where
you can store files relating to the supplier, like price lists, specials, etc. Next click the Edit the Supplier Details button to
take you to the Supplier Details page.
To work correctly, JAQ requires at least the following. Phone Number, A Delivery Address and Postal Address, and their Payment Terms.
You should also make the Supplier Active. When Active, JAQ will allow new purchase orders to be created for this
Supplier. When not Active ( say for example you would prefer to use a different supplier ), JAQ will not allow any new
purchases to be created against this supplier.
If this supplier is a courier or transport business, tick the Courier box. If the Courier box is ticked, this supplier will be
included in the Preferred Courier drop down list on the Customer Details page.
Once you have provided JAQ with as much supplier detail as possible, click Save to return to the Supplier Details page.
If you have a preferred contact person at the supplier, you should add them as a Contact. To add a contact, click on the
New button above the Contacts list on the Supplier Details page.
Creating a new Purchase
From the top menu, select → New Purchase. You can also create a new purchase using the New Purchase
Order button on the Supplier Details page, or the Add a new Purchase button under the Purchase Orders tab on the Job
Card page.
The New Purchase page will ask you for a Supplier and JobNo, click on the mag glass ( ) to display the supplier and
job popup pages, where you can select the supplier and jobno ( including sub jobs and internal jobs ). Click Next to
proceed.
JAQ will create the purchase for you and display the Purchase Order page. To edit the purchase order, click the Edit button. This will display the Edit Purchase Order page where you can......
- Enter any notes, either internal for your own reference, or to be printed on the purchase order for the
suppliers eyes.
- Choose a delivery branch and department, if you want the goods to be delivered to a particular area.
- Change the Status.
The Status can bet set to...
New. Purchase created and waiting for goods to arrive.
Received. Good received, paperwork/pricing still pending.
Closed. Goods received and paperwork completed, including invoice and price details entered into JAQ.
Makeshift. Makeshift PO's are temporary or pending PO's, and can not be sent to the supplier unless they are changed to New.
Cancelled. PO no longer required.
The Assigned To person will receive messages when the goods have arrived and Status changed to Received, and the goods have not arrived and the Required By date has passed.
JAQ will automatically display the suppliers payment terms ( from the Supplier Details page ) on the purchase order. If you enter the Payment Due date, JAQ will notify
you with a message when payment is due, and keep notifying you until a Date Paid is entered.
The Edit Purchase Order page also displays the PO's line items. You can manually enter the items, or choose from the Stock List.
For more information on the Stock Quick Pick, see the Stock & Consumables section below.
When the purchase order section is used correctly, JAQ will track purchases pricing on any job, and notify if an order is
late or has arrived.
Note:
- JAQ requires a Required By
date before it will let you save the purchase order.
- A purchase order needs to be closed before JAQ will consider the purchase price valid.
If your JAQ can been configured to send emails ( contact your supervisor is its not and you need this feature ), you can create a Purchase Order PDF and email it directly from JAQ.
Back to the Job Card, under the Purchase Orders tab, JAQ will display a summary of purchases, including total cost and
charge price, and an Account summary.
 Stock / Consumables
Stock and Consumables are the same thing, and in JAQ can be called either.
There are 3 area’s in JAQ associated with Stock.
- The Stock list, where you can add, edit and view stock items.
- The Ordering section, where you order in stock.
- The Job section, where you book out stock
Ordering in Stock
From a purchase order, if you click on the magnify glass icon to the left of the details field in the line items, JAQ will open the Stock Quick
Pick popup. By default, the list will display items from the supplier you raised the PO for.
When you change the PO to Received, JAQ will add the quantities ordered into stock
Booking Out Stock/Consumables
The Job page will let you book out Stock in two ways, both accessible from the Stock tab on the job page.
If the stock item is included in the job items list, you can click on the Book out stock from Job Items button. This will open a page where all the job items with a category of Stock will be displayed. You can select the ones you want to book out, change the quantity if required, and even add a sub job number if its for a sub job. Click Submit, and JAQ will book out the stock items and take you back to the job page.
You can also use the Book out stock item button. This will open a page where you can search for the stock item from the stock list, or use a bar code scanner to scan the items bar code. Remember to Save.
 Booking hours against the job.
The fastest way to book hours to a job is via the Book Hours button on the Hours tab of the job page. This will open a page where you can select the employee and date ( defaults to you, today ). Click Next, and the page will let you add the hours, and choose a Charge Code. Click Book Hours and JAQ will do the rest.
Note:
Charge Code are codes JAQ use to cost a action of process. eg FAB is Fabrication, ADM for Administration, etc. These are set up on the JAQ Setup menu / Charge Codes
You can also book hours from the Timesheet pages. Open → My Timesheets to see the time sheet entry page for you for today. Alternatively, if you wanted to change the date, or employee, use the → Timesheets by person page, select the date and employee, and open the timesheet entry page.
On the timesheet entry page, click to open a job list popup, from where you can select the job number from Customer Jobs, Internal
Jobs or Sub Jobs tabs. Clicking on the job number will close the popup and copy the job number to the time sheets page.
Next use the Time In Hours drop down's to enter the time spent on that job, then select a Charge Code from the drop down list, and finally click Save.
JAQ will add the hours against the job you selected, using the charge code you selected. If JAQ encounters an error,
which can happen if the charge rates have not be set up correctly, it will let you, and its important that you let your
supervisor know about this. When this happens, JAQ will not add the hours to the job card.
Back on the Job Card, JAQ will display a summary of the hours booked, including which employees worked on this job,
the Charge Codes used, and a breakup of the Sub Jobs hours.
 Dispatching.
In JAQ we have two types of delivery. A Delivery Docket, and a Shipping Docket. The only real difference is a Delivery is sent to the customer, and a Shipping is sent to another supplier for further work, eg, sending something out to get powder coated.
To raise a Deliver Docket, on the Deliveries tab of the job card, click Add a new Delivery Docket. This will
open the New Delivery Docket page. JAQ will use information from the job card to populate the new delivery docket,
like the delivery address, contact, etc. This is another example of how adding the correct information to the quote or job
card can save you time in the long run.
If the customer has a Preferred Courier, JAQ can create and print a purchase order for the courier company along with the delivery dockets. Just tick the Create PO tick box.
The Delivery Docket displays a list of any job items ticked as Goods from your job card. The Qty In This Delivery column
will display the quantity value from the job card, but you can change this value if you are delivering less than the number
ordered. JAQ will keep track of how many items are delivered, and when you create another new delivery docket, JAQ
will subtract previous delivery quantities from the total quantity on the job card, and display the outstanding quantity on
the new delivery docket.
New delivery dockets are flagged as Waiting for Pickup. When the delivery has been made, or picked up by the courier,
you need to edit the delivery docket and change the status from Waiting for Pickup to Gone. You should also enter the
Con Note Number if known. Adding this information makes it easier to track and confirm a delivery was dispatched.
When you print the delivery docket, JAQ will give you a couple of options.
- Print Courier Copy. This is the copy the courier takes with them.
- Print Office Copy. This should be signed by the courier, and kept by you as proof of delivery.
- Print Purchase Order. This is a PO to the courier company for this delivery, where you will be paying
for delivery. The PO is added to JAQ as a regular PO, against this job.
Shipping dockets can be either from you to to you. If the shipping docket is to you, you can enter a expected delivery date, and JAQ will let you know if its not been delivered on time
There is a searchable list of delivery and shipping dockets for all jobs under the menu → Delivery List.
Reviewing how the job is going.
If the purchases, hours, consumables and sub jobs have been entered correctly by all employees
involved with a job, then JAQ can give you a good idea on how the job is progressing.
On the Job Card we have a panel called Progress & Notifications, and this will display
information like booked hours compared to estimated hours, any
outstanding purchase orders, undelivered job items, etc. Its a good idea to
keep an eye on the Progress panel.
We also have a Booked out total prices panel, where JAQ displays information on job
costing's to date, and if the job is on budget or over budget.
Note:
In JAQ, a job can have more than one price.
- Quoted Price is the price from the quote page, if quoted.
- Job Price, the total of the jobs line items.
- Booked Price, the total of everything booked out.
- Invoice Price, the total of the invoices.
This is by design, JAQ just presents all the data, its up to you to choose how best to price the job
|
|
Closing the job and invoicing the customer.
When the job has been completed, you can click on the Close Job Card button. Before closing the job, JAQ will check a
few things first, like any un-closed purchase orders, uncompleted sub jobs, undelivered items, etc, and warn you about
these problems. Its then up to you to go back and sort out these problems, but JAQ will still let you close the job anyway.
If you are using JAQ to create invoices, under the Invoices tab, click Create Invoice. The New Invoice page will display everything, all the line items, booked hours, stock, the lot. Its up to you to choose how you will invoice the job. If there are previous invoices for this same job, they will be displayed at the bottom of the page so you can refer back to them.
Note:
If you create the invoices in a separate accounting program or a invoice book, is a good idea to record the invoice number in JAQ, so other users know if and when a job has been invoiced, without having to look it up in another system.
Go explore.
This tutorial just touches on the bare basics of using JAQ, and there is a lot more to discover, especially when it comes to shortcuts and reports.
The best advise is to look into all the menu's, see what's there. If you need something, or have a suggestion, please get in contact.
support@jaqsoftware.com
Back to the Help Menu
